To configure RAID5 on CentOS 7
,
RAID level 5 uses striping, which means that the data is distributed over the number of disks used in the array and also provides redundancy with the help of distributed parity. RAID 5 is the best cost-effective solution for both performance and redundancy. The minimum number of disks required for RAID 5 is 3 disks. An important part of RAID5 is that read speed is much better than writing. And this is due to parity overload. It is very simple to configure RAID5 and this article covers the method to configure RAID5 on CentOS 7.
<img src
=”https://assets.linuxhelp.com/scr/66d0f570f4f993afa09f4fb4252222ce.png” alt=”raid 5″ />
What is
parity? RAID
5 is a type of RAID that offers redundancy using a technique known as “parity”. Parity is a type of additional data that is calculated and stored along with the data that the user wants to write to the hard disk. This additional data can be used to verify the integrity of the stored data, and also to calculate any “missing” data if some of your data cannot be read (such as when a drive fails).
Hot Spare: –
A hot spare is used as a failover mechanism to provide reliability in system configurations. When a hard disk fails, the hot spare hard disk will be put into operation.
Hot-swapping
: Hot-swapping
is a term used to describe the ability to replace a failed disk drive without rebooting the machine
.
RAID5 Configuration
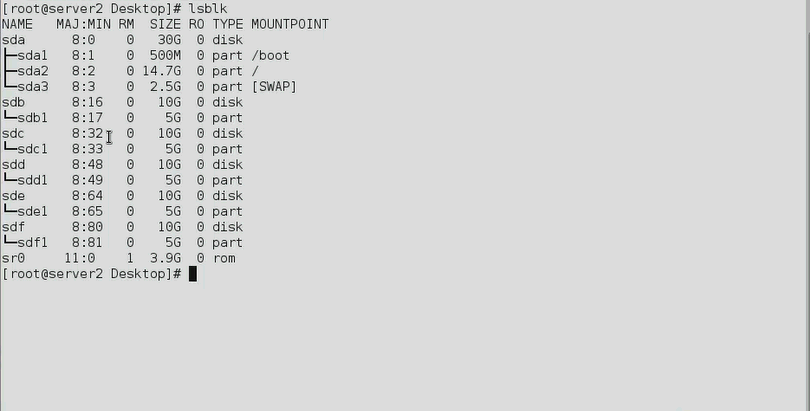
Before starting with the process, you need to check the availability of the disk using the following command.
Once you have checked the availability of the disk, you need to install the mdadm package as it is very essential for RAID configuration.
[[email protected] ~]# yum install mdadm -y Plugins loaded: fastestmirror, langpacks Loading mirror speeds from cached host file * base: centos.myfahim.com * extras: centos.myfahim.com * updates: centos.myfahim.com . . . Verifying : mdadm-4.0-5.el7.x86_64 1/2 Verifying: mdadm-3.2.6-31.el7.x86_64 2/2 Updated: mdadm.x86_64 0:4.0-5.el7 Complete!
And then, check if the block details are already configured by making use of the following command.
[[email protected] Desktop]# mdadm -E /dev/sd[b-f]1 mdadm: No md superblock was detected in /dev/sdb1. mdadm: No md superblock was detected in /dev/sdc1. mdadm: No md superblock was detected in /dev/sdd1. mdadm: No md superblock was detected in /dev/sde1. mdadm: No md superblock was detected in /dev/sdf1.
Later, you need to create an md device. Run the following command that has the RAID levels (RAID partition) along with the number of devices and their names. After that, those disks will be added.
[[email protected] Desktop]# mdadm -create /dev/md5 -level=5 -raid-devices=3 /dev/sd[b-d]1 mdadm: Default to version 1.2 metadata mdadm: array /dev/md5 started.
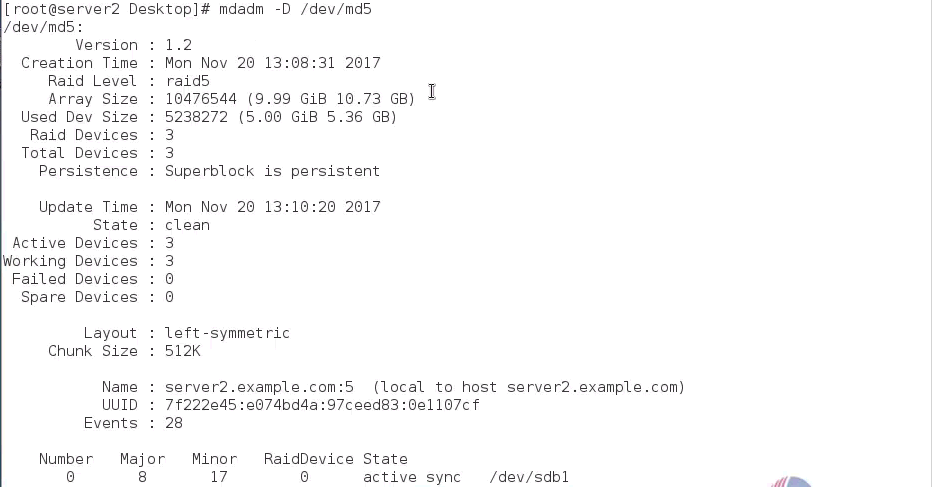
After that, you should check if the level of RAID devices is the same as your configuration.
[[email protected] Desktop]# mdadm -D /dev/md5
Next, you need to create a file system for raid devices. It is essential to mount the RAID device. Run the following command for the same purpose.
[[email protected] Desktop]# mkfs.ext4 /dev/md5
And then, you need to create a mount point directory named raid5, which will be done using the
mkdir command. [[email protected] Desktop]# mkdir /raid5
Next, you must permanently mount the RAID using the UUID of that device. So run the following command that generates your UUID.
[[email protected] raid1]# blkid /dev/md5 /dev/md5: UUID=” 3a27f241-d7c2-4e56-893e-93042ae62398″ TYPE=” ext4″
And, use that UUID along with the mount point to permanently mount that
RAID device. [[email protected] raid1]# vim /etc/fstab UUID=3a27f241-d7c2-4e56-893e-93042ae62398 /raid5 ext4 defaults 0 0
Run the mount command and check the status of the mounted RAID device.
[[email protected] ~]# mount -a [[email protected] ~]# df -h File system size used Available usage% Mounted on /dev/sda2 15G 4.6G 11G 31% / devtmpfs 741M 0 741M 0% /dev tmpfs 749M 140K 749M 1% /dev/shm tmpfs 749M 8.9M 741M 2% /run tmpfs 749M 0 749M 0% /sys/fs/cgroup /dev/sda1 497M 116M 382M 24% /boot /dev/md5 9.8G 37M 9.2G 1% /raid5
Now, go to the mount point and create a file and directory on it. So, when you list the files at that mont point, you will see the file name and directory in it.
[[email protected] ~]# cd /raid5/ [[email protected] ~]# mkdir dir1 [[email protected] ~]# touch fail.txt [[email protected] raid5]# ls -l total 24 drwxr-xr-x. 2 root root 4096 Nov 20 13:20 dir1 -rw-r-r-. 1 root root 25 Nov 20 13:20 fails.txt Now you need to check the
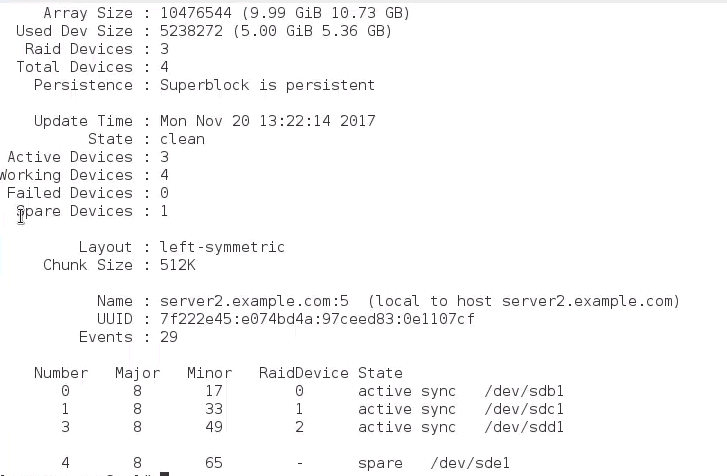
fault tolerance by adding the spare disk on the RAID5 device, and for that, you should use the following command
. [[email protected] ~]# mdadm -manage -add /dev/md5 /dev/sde1
Later, you need to check the availability of the spare disk as follows. Information from those devices is listed as output.
[[email protected] ~]# mdadm -D /dev/md5
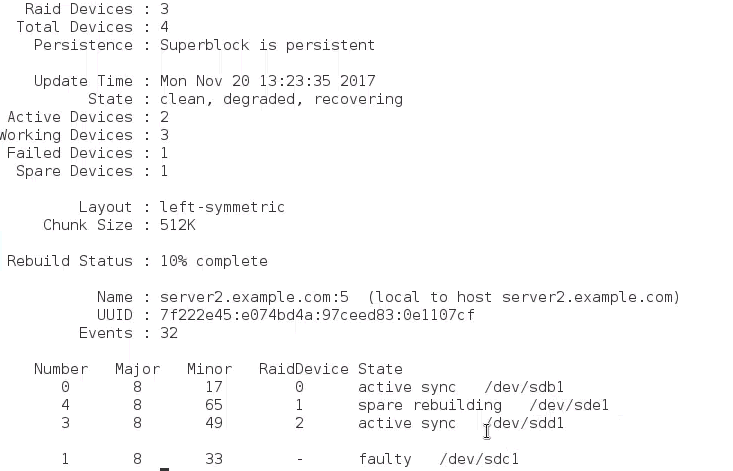
Now, you need to test fault tolerance by manually failing a device. And for that you will need to run the following command that has the name of the device that is going to fail.
[[email protected] ~]# mdadm -manage -fail /dev/md5 /dev/sdc1 mdadm: set /dev/sdc1 faulty in /dev/md5 You can also check the status of
that failed device
. [[email protected] ~]# mdadm -D /dev/md5
After completing the rebuild process, you can go to the mount point and check the availability of the data.
[[email protected] ~]# cd /raid5/ [[email protected] raid5]# ls -l total 24 drwxr-xr-x. 2 root root 4096 Nov 20 13:20 dir1 -rw-r-r-. 1 root root 25 Nov 20 13:20 fails.txt
Finally, don’t forget to save the raid settings
. [[email protected] raid5]# mdadm -detail -scan -verbose > > /etc/mdadm.conf
With this, the method to configure Raid5 on CentOS 7 comes to an end.