This section explains how to create and work with Helm graphics repositories. At a high level, a graphics repository is a location where packaged graphics can be stored and shared.
The distributed community’s Helm graphics repository is located on the Artifact Hub and welcomes participation. But Helm also makes it possible to create and run your own graphics repository. This guide explains how to do this.
Prerequisites
- See the Quick Start Guide
- Read the document Charts
Create
a graphics repository
A graphics repository is an HTTP server that hosts an index.yaml file and, optionally, some packaged graphics. When you’re ready to share your charts, the preferred way to do so is by uploading them to a graphics repository.
Starting with Helm 2.2.0, client-side SSL authentication is supported for a repository. Other authentication protocols may be available as add-ons.
Because a graphics repository can
be any HTTP server that can serve YAML and tar files and can respond to GET requests, you have a wealth of options when it comes to hosting your own graphics repository. For example, you can use a Google Cloud Storage (GCS) bucket, an Amazon S3 bucket, GitHub pages, or even create your own web server.
The structure
of the graphics repository A graphics repository consists of
packaged charts and a special file called index.yaml that contains an index of all the charts in the repository. Often, the charts that index.yaml describes are also hosted on the same server, as are the source files.
For example, the repository layout might https://example.com/charts look like this:In this
case, the index file
would contain information about a chart, the alpine chart, and provide the https://example.com/charts/alpine-0.1.2.tgz download URL for that chart
.
A graphics package does not need to be on the same server as the index.yaml file. However, doing so is often the easiest.
The index file
The
index file
is a yaml file named index.yaml. Contains some metadata about the package, including the contents of a chart Chart.yaml file. A valid graphics repository must have an index file. The index file contains information about each chart in the graphics repository. The helm repo index command will generate an index file based on a particular local directory that contains packaged graphics.
Here is an
example of an index file:
Hosting Chart Repositories
This part shows several ways to serve a chart repository
.
Google Cloud Storage
The first step is to create your GCS bucket. We will call our graphics fantastic.
<img src="https://helm.sh/img/create-a-bucket.png" alt="
Create a GCS
bucket” />
Then make the bucket public by editing the bucket permissions.

Insert this line item to make your bucket public:
 ¡
¡
Congratulations, you now have an empty GCS bucket ready to serve charts!
You can upload your graphics repository using the Google Cloud Storage command-line tool or the GCS web UI. A GCS public bucket can be accessed over simple HTTPS at this address: https://bucket-name.storage.googleapis.com/.
Cloudsmith
You can also set up graph repositories using Cloudsmith. Read more about
graphics repositories with Cloudsmith here JFrog Artifactory Similarly, you can also configure graphics repositories using
JFrog Artifactory
. Read more about graphics repositories with JFrog Artifactory here
GitHub Pages example
Similarly, you can create a graphics repository using GitHub Pages.
GitHub allows you to serve static web pages in two different ways:
When setting up a project to serve the
- contents of your docs/ directory. When setting up a project to serve a
- particular
branch,
we’ll take the second approach, although the first is just as easy
.
The first step will be to create your gh-pages branch. You can do it locally like.
Or through the web browser using the Branch button in
your GitHub repository:<img src="https://helm.sh/img/create-a-gh-page-button.png" alt="Create GitHub Pages Branch
” />
Next, you’ll want to make sure your gh-pages branch is set to GitHub Pages, click on your repository settings and scroll down to the GitHub pages section and set the following:
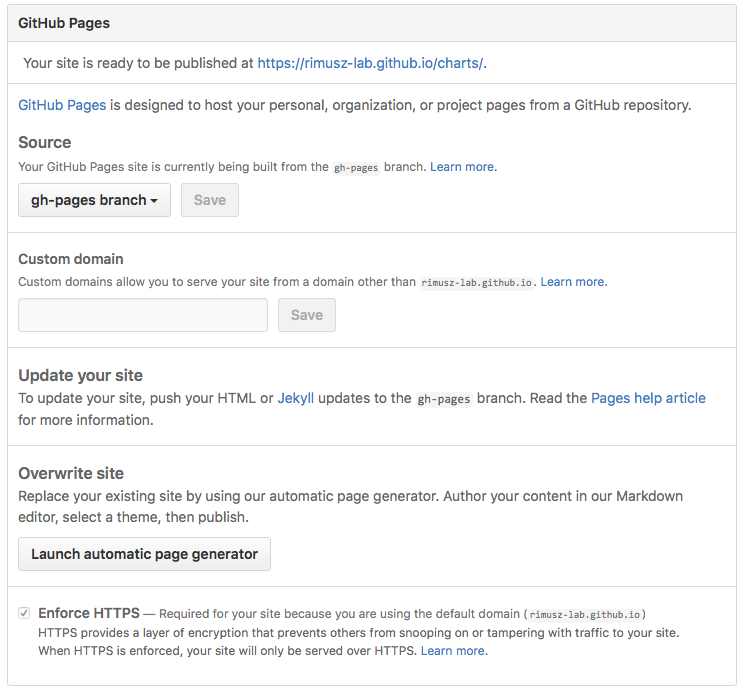
By default Source is usually set to the gh-pages branch. If it is not configured by default, select it.
You can use a custom domain there if you want.
And verify that Enforce HTTPS is checked, so HTTPS will be used when graphics are served.
In such a configuration, you can use its default branch to store your graphics code and the gh-pages branch as a graphics repository, for example: https://USERNAME.github.io/REPONAME. The TS Charts demo repository is available on https://technosophos.github.io/tscharts/.
If you’ve decided to use GitHub pages to host your graphics repository, see Chart Liberator Action. Chart Releaser Action is a GitHub Action workflow for converting a GitHub project into a self-hosted Helm chart repository, using the helm/chart-releaser CLI tool.
Ordinary
web servers
To configure a regular web server to serve Helm charts, simply do the following:
Place the index
- and charts in a directory
- index.yaml file can be accessed without authentication Make sure
- yaml files are served with the correct content type (text/yaml or text/x-yaml)
that the server can serve Make sure that the
that
For example, if you want to serve your charts outside of $WEBROOT/charts, make sure there is a charts/ directory in your web root, and place the index file and charts inside that folder.
ChartMuseum
Repository Server ChartMuseum
is an open source Helm graphics repository server written in Go (Golang), with support for cloud storage backends, including Google Cloud Storage, Amazon S3, Microsoft Azure Blob Storage, Alibaba Cloud OSS Storage, Openstack Object Storage, Oracle Cloud Infrastructure Object Storage, Baidu Cloud BOS Storage, Tencent Cloud Object Storage, DigitalOcean Spaces, Minio and etcd.
You can also use the ChartMuseum server to host a graphics repository from a local file system.
GitLab Package Registration
With GitLab, you can publish Helm charts to your project’s Package Log. Read more about setting up a helm package repository with GitLab here.
Managing graphics repositories
Now that you have a graphics repository, the
last part of this guide explains how to maintain
graphics in that repository.
Store
charts in your graphics repository
Now that you have a graphics repository, let’s upload a chart and index file to the repository. Charts in a graphics repository must be packaged (helm package chart-name/) and versioned correctly (following SemVer 2 guidelines).
These following steps make up a sample workflow, but you can use any workflow you want to store and update graphics in your graphics repository.
Once you have a packaged chart
ready, create a new
directory and move the packaged chart to that directory.
The last command takes the path of the local directory you just created and the URL of your remote graphics repository and composes an index.yaml file within the given directory path.
You can now upload the chart and index file to your chart repository using a sync tool or manually. If you’re using Google Cloud Storage, check out this sample workflow with the gsutil client. For GitHub, you can simply place the charts in the appropriate target branch.
Add new charts
to an existing repository
Each time you want to add a new chart to the repository, you must rebuild the index. The helm repo index command will completely rebuild the index.yaml file from scratch, including only the charts it finds locally.
However, you can use the -merge flag to gradually add new charts to an existing index.yaml file (a great choice when working with a remote repository like GCS). Run helm repo index -help for more information,
be sure to upload both the revised index.yaml file and the chart. And if you generated a source file, upload it too.
Share
your charts with others
When you’re ready to share your charts, just let someone know what your
repository URL is.
From there, they will add the repository to their helm client via the helm repo add [NAME] [URL] command with any name they wish to use to reference the repository.
If the graphics are supported by HTTP Basic authentication, You can also provide the username and password here
:Note:
A repository will not be added if it does not contain a valid index.yaml. Note
: If your helm repository is, for example, using a self-signed certificate, you can use helm repo add -insecure-skip-tls-verify … to bypass CA verification.
After that, your users will be able to search through your charts. After updating the repository, they can use the helm repo update command to get the latest chart information.
Under the hood, the helm repo add and helm
repo update commands get the index.yaml file and store them in the $XDG_CACHE_HOME/helm/repository/cache/ directory. This is where the rudder search function finds information about charts.