When you install WordPress on your hosting account, the software adds a list of directories to your web server. From wp-admin that stores administrative files to the wp-content directory where themes and plugins are saved, they keep your pages running.
In addition to the central directories, WordPress also comes with the . htaccess. In short, it is a configuration file that controls how your server runs. The file is only supported by a few web servers, including Apache.
If your website is hosted on an Apache web server and you want to use the . htaccess, this article is for you. We will give you the details about this configuration file and information on how to locate it and create a new file completely.
 What is the .htaccess file <
=”https://www.hostinger.co.uk/tutorials/wp-content/uploads/sites/2/2021/08/cpanel-file-manager-2.png” alt=”The .htaccess file
htaccess (hypertext access) is a critical WordPress core file used to enable or disable Apache-hosted website features. The . htaccess are also known as server configuration files located in your WordPress root directory. By default, WordPress uses . htaccess to manage redirects and permalink structures.
Many WordPress plugins
also use . htaccess to operate, including most security plugins and caching plugins. These plugins modify and rewrite . htaccess to perform its functions.
The . htaccess allows you to make configuration changes per directory, from altering your default index page to changing your website’s time zone. More advanced server configuration changes include the ability
to:
- Configure Redirects: You can set a 302 redirect to your temporary domain or a 301 redirect to move all HTTP traffic to your HTTPS site
- Rewrite URLs: Create SEO-friendly URLs to improve indexability and crawlability of search engines
- Enable hotlink protection – the .htaccess allows you to prevent hotlinking from your site and protect your bandwidth usage.
- Modify access restriction: deny specific IP addresses of your site, make a certain type of files inaccessible, or completely restrict access to your site.
- Serve custom error pages: Customize the message that appears on 404 error pages not found.
- Password-protected directories: Sort each directory that requires a valid user by setting a password and creating a . htpasswd.
.
.
Access this free .htaccess generator page to generate code snippets and set up more advanced rules
on your site.
How to locate
the .htaccess file
When you install WordPress on the Apache web server, the . htaccess is automatically added to your root directory, usually labeled public_html or www. However, since the file is usually hidden, you will need to use the Show hidden files option to find it.
The following sections will guide you through the steps to locate the . htaccess of your WordPress site in both Hostinger’s hPanel and cPanel.
hPanel
Here’s how to find and edit your . htaccess via Hostinger File Manager: Access
- your hPanel control panel. Click File Manager under Files in the sidebar menu.
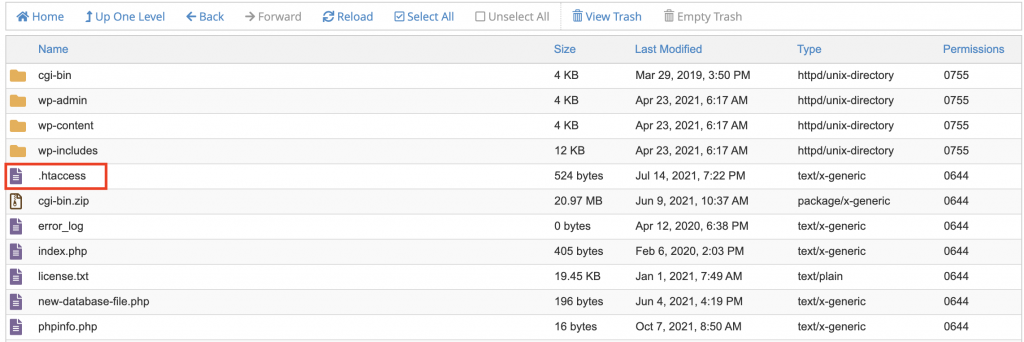
- By default, the . htaccess is not hidden in hPanel. So, just click on your public_html directory and look for a file labeled . htaccess. <img
src=”https://www.hostinger.co.uk/tutorials/wp-content/uploads/sites/2/2021/08/wp-publichtml.png” alt=”.htaccess file highlighted in public_html folder in hPanel” />
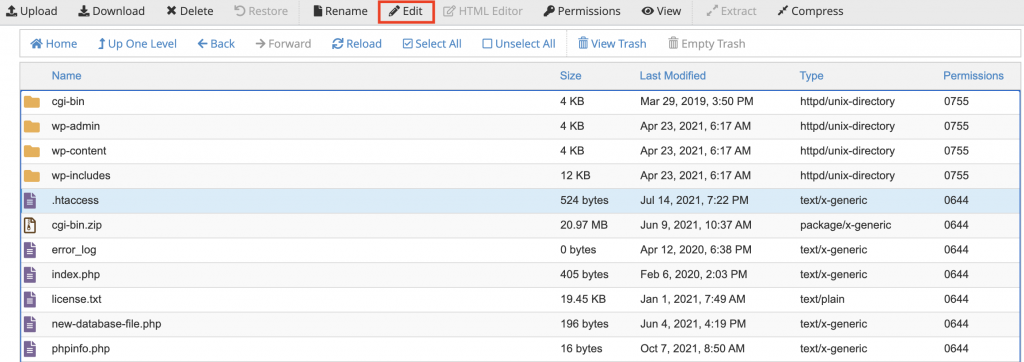
- Access the file and its contents by right-clicking and selecting Edit.<img src="https://www.hostinger.co.uk/tutorials/wp-content/uploads/sites/2/2021/08/wp-publichtml-1024×471.png" alt="The Edit option for the .htaccess file highlighted in the public_html folder in hPanel” />
cPanel
If you use cPanel, the process is more or less similar:
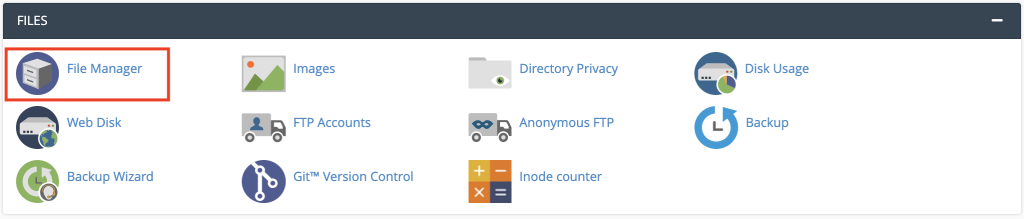
- Log in to your cPanel account. Locate the Files section and click File Manager.
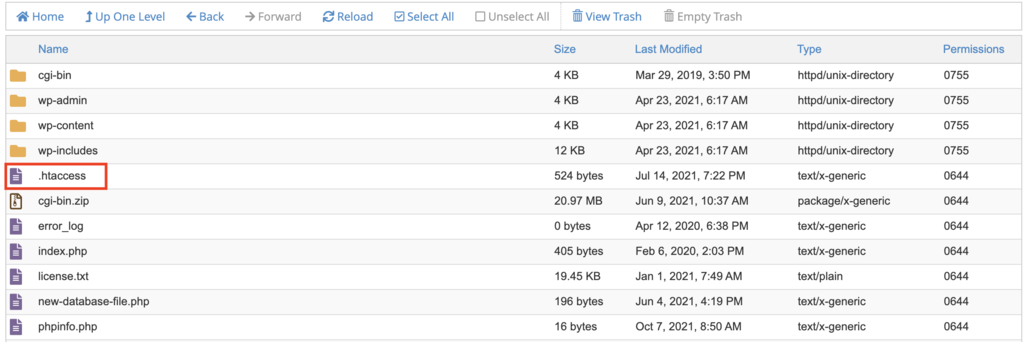
- Access the public_html directory. Click on your WordPress folder. In this case, it is labeled wp. Then, locate the . htaccess.
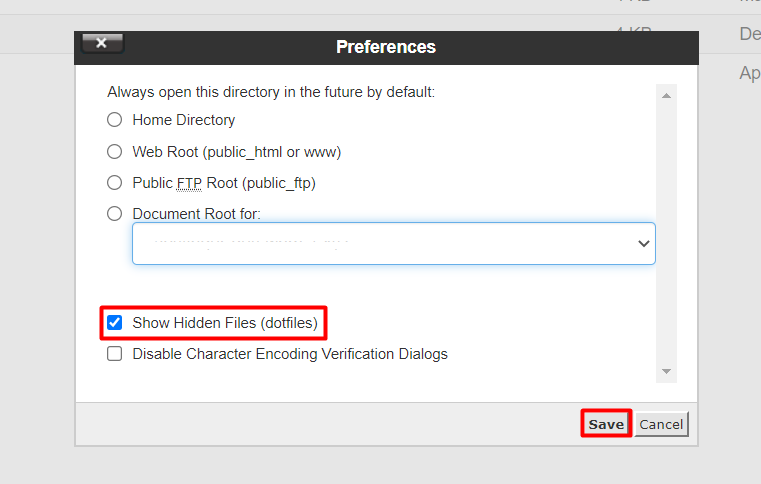
- If you cannot find the . htaccess, go to Settings in the top right menu and check the Show hidden files option to enable viewing.
- The system will start retrieving the contents of your directories, and soon you will see the . htaccess in the list.

- Just click on the file and check the Edit button to open it.
Now that you have located your . htaccess, you can start editing the file. Start adding code snippets above or below existing code to improve the functionality of your WordPress site. However, before you do any setup, there are several factors worth paying attention to:
- If you have more than one domain on your hosting plan, each domain will have its own .htaccess file in its public_html directory. Since. htaccess
- It is a server configuration file, messing up the code can cause server errors.
- It is strongly recommended to create a backup. This way, you can restore your WordPress site to its steady state whenever an error occurs.
How to create an
.htaccess file
There are some instances where your WordPress installation will not include the . htaccess by default. Alternatively, a broken plugin could corrupt this server configuration file and disrupt your site. In these cases, you will need to create a new file from your hosting control panel manually.
hPanel users will locate the New File button in the left sidebar menu on the File Manager page.
If you use cPanel, choose the New File button in the upper-left corner of the screen.
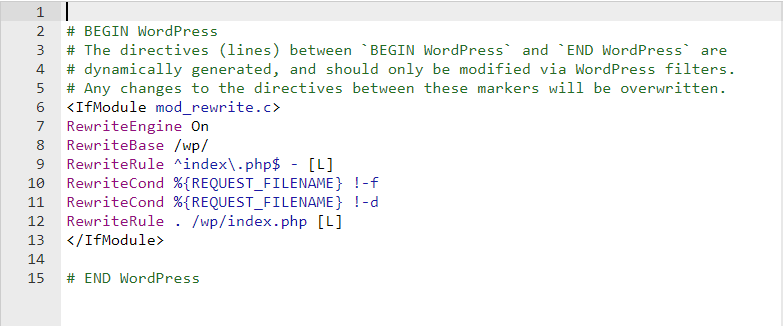
Enter. htaccess as the file name, then insert the following code:
# BEGIN WordPress <IfModule mod_rewrite.c> RewriteEngine in RewriteBase / RewriteRule ^index.php$ – [L] RewriteCond %{REQUEST_FILENAME} !-f RewriteCond %{REQUEST_FILENAME} !-d RewriteRule. /index.php [L] </IfModule> # END WordPress
Once you have added the code, press Create to save the changes. Note that the code is universal for all WordPress sites. However, other content management systems (CMS) will have different code for their . htaccess.
In addition to the previous method, you can also use a text editor such as Notepad to create a . htaccess and then upload it to your web server using an FTP client.
Conclusion
The . htaccess is a configuration document for use on websites running on the Apache web server. This file plays an important role in keeping your site accessible. Determines how the server runs and functions.
Each WordPress installation will include a . htaccess which you can access through your hosting control panel or FTP client. When you host multiple sites, your web server will also have multiple . htaccess.
By making full use of your . HTAcse, you can make multiple configuration changes per directory. This includes blacklisting or whitelisting specific IP addresses, redirecting traffic from HTTP to HTTPS, and setting a password on each directory.
In this guide, you learned how to locate . htaccess on your server. If .htaccess files are not present for some reason, you need to create one manually and upload it to your server. Just create a new file in the public_html directory, label it as . htaccess and fill in the default code.
Try it out, and if you have more questions, leave them in the comments below.
WordPress .htaccess
FAQ
Learn more about WordPress .htaccess in this FAQ.