SSH has become the default method for accessing a remote Linux server these days.
SSH stands for Secure Shell and is a powerful, efficient and popular network protocol that is used to establish communication between two computers remotely. And let’s not forget the sure part of his name; SSH encrypts all traffic to prevent attacks such as hijacking and eavesdropping, while offering different authentication methods and a host of configuration options.
In this beginner’s guide, you’ll learn:
The basic concept of SSH Setting up the SSH server (
- on the system you want to access remotely
- Connecting to the remote server via SSH from the client machine (your personal computer)
- of SSH
)
The absolute basics of SSH Before looking at any setup process, it will be best to go through the absolute basic concept
.
The SSH protocol is based on the server-client architecture. The “server” allows the “client” to connect through a communication channel. This channel is encrypted and the exchange is governed by the use of public and private SSH keys.
OpenSSH is one of the most popular open source tools that provides SSH functionality on Linux, BSD, and Windows.
For a correct SSH configuration, you must:
- Have SSH server components on the machine acting as the server. This is provided by the openssh-server package.
- Have the SSH client component on the machine from where you want to connect to the remote server machine. This is provided by the openssh-client package and most Linux and BSD distributions come pre-installed with it.
It is important to maintain a distinction between server and client. You may not want your personal computer to act as an SSH server unless you have good reasons for others to connect to your system via SSH.
Generally, you have a dedicated system that functions as a server. For example, a Raspberry Pi running the Ubuntu server. It enables SSH on the Raspberry Pi so you can control and manage the device from your main personal computer using SSH on a terminal.
With that information, let’s see how you can set up an SSH server on Ubuntu.
Setting
up SSH server in Ubuntu
Setting up SSH is not complicated and you only need a few steps to do it
.
Prerequisites
- A user with sudo privileges on the server machine
- Internet connection to download the necessary packages
- At least one other system on your network. It can be another computer on your LAN, a remote server over the Internet, or a virtual machine hosted on your computer.
Again, the installation of the SSH server must be done on the system that you want to act as a server and to which you want to connect remotely via SSH.
Step 1: Install
the necessary packages
Let’s start by opening a terminal window to enter the necessary commands
.
Remember to update your Ubuntu system before installing new packages or software to make sure you are running the latest versions.
sudo apt update && sudo apt
update The package you need to run SSH Server is provided by
the openssh-server component of OpenSSH: sudo apt install openssh-server
Step 2: Check the server status
Once the package is downloaded and installed, the SSH service should already be running, but to be sure we will check it with: Service SSH
status You
can also use the systemd commands:
sudo systemctl status ssh
You should see something like this, with the word Active highlighted. Press q to return to the command prompt.
If in your case the service is not running you will have to activate it like this
: sudo systemctl enable -now ssh
Step 3: Allow SSH through the
firewall
Ubuntu comes with a firewall utility called UFW (UncomplicatedFirewall) which is an interface for iptables which in turn manages network rules. If the firewall is active, you can prevent the connection to your SSH server.
To configure UFW to allow the
desired access, you must run the following command:
sudo ufw allow ssh
The status of UFW can be checked by running sudo status ufw
.
At the moment our SSH server is up and running, waiting for a connection from a
client.
Connecting to the remote system from
the local computer
Your local Linux system should already have the SSH client installed. Otherwise, you can always install it using the following
command in Ubuntu: sudo apt install openssh-client To connect to your Ubuntu system you need to know the IP address of the computer and use the ssh command, like this: ssh [email protected] Change the
username to your real user on the system and the address to the IP address of your Ubuntu machine.
If you don’t know the IP address of your computer, you can type ip a in the server terminal and check the output. You should have something like this:
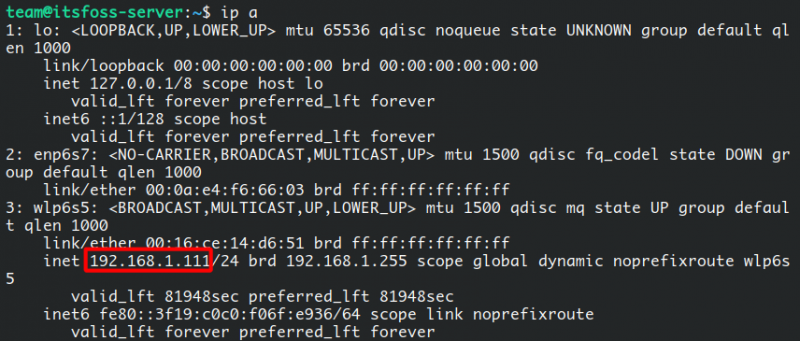
IP address
As you can see here, my IP address is 192.168.1.111. Let’s try to connect using the format [email protected].
ssh [email protected]
The first time you connect to an SSH server, it will ask for permission to add the host. Type yes and press Enter to continue.
to the server
Immediately SSH tells you that the host was permanently added and then asks for the password assigned to the username. Type in the password and press Enter once again.
voila! You will log into your Ubuntu system remotely
!
You can now work on your remote system terminal normally.
Close the SSH connection
To close the connection you only need to write exit and it will close it immediately, without asking for confirmation
.
Stop and disable SSH in Ubuntu
If you want to stop the SSH service, you will need this command:
sudo systemctl stop ssh This will stop the service until you restart it
or until the system restarts. To restart
it, type: sudo systemctl start ssh
Now, if you want to disable it from starting during system boot, use this:
sudo systemctl disable ssh
This will not prevent the service from running during the current session, it will only be loaded during startup. If you want it to start again during system boot, type
: sudo systemctl enable ssh
Other
SSH clients
The ssh tool is included in most *nix systems, from Linux to macOS, but those are not the only options that exist, here are a couple of clients that can be used from other operating systems:
- PuTTY is a free and open source SSH client that is very popular among Windows users. You can also install PuTTY on Ubuntu. It is full of features and is very easy to use. If you are connecting to your Ubuntu machine from a Windows station, PuTTY is an excellent choice.
- JuiceSSH is an amazing tool for Android users. If you are on the go and need a mobile client to connect to your Ubuntu system, I highly recommend you try JuiceSSH. It has been around for almost 10 years and is free to use.
- And finally, Termius is available for Linux, Windows, macOS, iOS and Android. It has a free level version and also several premium options. If you are running a lot of servers and working with computers that share connections, Termius is a good choice for you.
Wrapping up
With these instructions, you can set up SSH as a server service on our Ubuntu systems so that you can remotely and securely connect to your computer to work with the command line and perform any required tasks
.
Our other website, Linux Handbook, has several informative articles about SSH. From here, I recommend reading the following:
Getting started with SSH
- on Linux
- Using the SSH Config file to manage multiple
- Add public key
- Protect Your
SSH connections
to SSH server for passwordless authentication SSH Protection Tips to
SSH Server
If you find it overwhelming, Linux Handbook has a premium video course that explains SSH for beginners along with hands-on labs to follow. This will give you a more agile knowledge of the subject.
Happy working remotely!