Many organizations use high availability frameworks for databases to ensure that operations continue in the event of a failure. One such database that follows this strategy is MongoDB. It was designed with the cloud in mind, but now has many advanced features, such as providing high availability for MongoDB databases by using partitioning and replication. It also enables simple scalability across distributed workloads. Although it can run as a single instance, it is most often used in the form of MongoDB clusters.
In this article, you will learn about MongoDB clusters. You’ll also gain a holistic understanding of MongoDB, its key features, the different architectures of MongoDB clusters, and the steps required to set up MongoDB clusters.
Table of Contents
- What is MongoDB?
- Main features of MongoDB
- What is a MongoDB cluster?
- Replica sets
- Partitioned clusters
-
- Clusters:
- Add Fragment to Cluster
- MongoDB
- :
Conclusion What is MongoDB? <img src="https://1000logos.net/wp-content/uploads/2020/08/MongoDB-Logo.jpg" alt="
clusters
Configuring MongoDB clusters Steps to configure MongoDB clusters MongoDB clusters: Configuring the configuration server MongoDB clusters: Configure Query Router MongoDB clusters: Configure Partition MongoDB
MongoDB
MongoDB is a non-relational document-oriented database (NoSQL database). It is used for high-volume data storage. It also provides support for JSON-like storage. Since it is a non-relational database, here instead of data being stored in the form of tables, MongoDB stores data in collections and documents. Documents in MongoDB comprise key-value pairs. These are the fundamental units of data in MongoDB. A collection consists of a set of documents. These NoSQL database collections are similar to relational database tables.
MongoDB has a flexible data model that allows you to store unstructured data. It also provides replication and full indexing support with the help of rich APIs. MongoDB uses JSON and MQL for its queries and interactive purposes. BSON supports data types such as floating-point, long, date, and many others that regular JSON does not have. MQL has more capabilities than regular SQL, which makes it more relevant to MongoDB because it processes JSON-type documents.
Here is an example of a JSON-like document in a database
MongoDB: { company_name: “Kinetic Motors”, address: {street: “2nd Avenue”, city: “Bengaluru”}, phone_number: “1-800-0000”, industry: [“automobiles”, “engines”] type: “private”, number_of_employees: 1290 }
Main features of
MongoDB <img src="https://webimages.mongodb.com/_com_assets/cms/kseryedf3pajb7i31-mongodb-replicaset.png" alt="MongoDB
The main features of MongoDB that make it unique are:
- High-performance
- scalability
- Availability flexibility
1) High performance
Since
MongoDB
is a NoSQL database, data operations are quick and easy. Data can be stored, manipulated, and retrieved quickly while maintaining data integrity.
2) Scalability
MongoDB data can be distributed quickly and consistently across a cluster of machines in the era of Big Data. The scalability of MongoDB is capable of handling increasing amounts of data. As data size grows, MongoDB uses fragmentation to scale it out across multiple servers.
3) Availability
MongoDB makes multiple copies of the same data and sends copies of data across different servers, making the data highly available. In the event that one server fails, data can be immediately retrieved from another server.
4) Flexibility
MongoDB easily integrates with various database management systems, both SQL and NoSQL. Due to the document-oriented structure, the MongoDB schema is dynamically flexible and various types of data can be easily stored and manipulated.
To learn more about MongoDB, click this link.
What is a MongoDB cluster?
Clusters in MongoDB refer to two different architectures. These are as follows:
Replica sets
- Partitioned clusters
- replica
1) Replica sets A MongoDB
set
is a collection
of one or more servers that contain an exact copy of data. While it is possible to have one or two nodes, three is the recommended minimum. One parent node handles read and write operations for the application, while two child nodes contain a replica of the data.
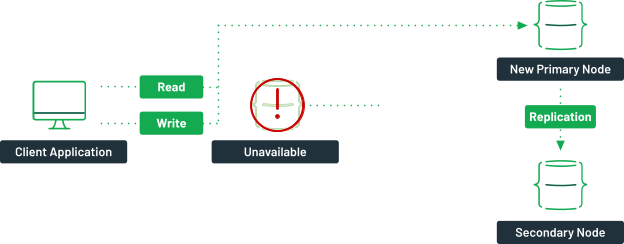
If the master node becomes unavailable for any reason, an election process will be used to select a new primary node. This new primary node is now in charge of read and write operations.
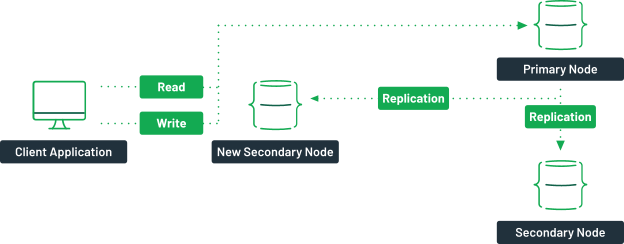
When the failed server returns to the network, it will synchronize with the master node and become a new secondary node in the cluster.
The goal is to provide the application with high data availability. Even if a server fails, the client application can connect to the cluster and access the data, minimizing potential downtime.
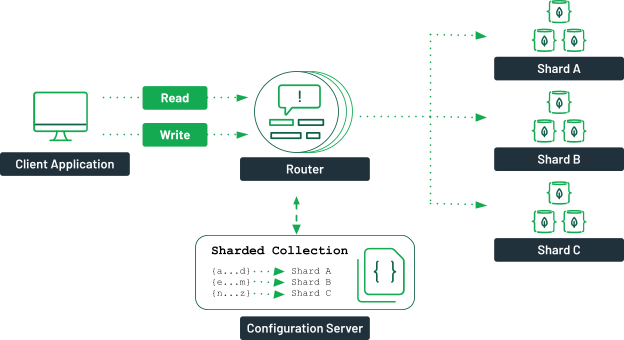
2) Partitioned clusters
A partitioned cluster is a method of scaling out data by distributing it across multiple sets of replicas. The client sends a request to the router (mongos) each time a read or write operation is performed on a collection. The router will use the configuration server to determine in which chunk the data is stored. It then sends the requests to the appropriate cluster.
Below is a typical partitioned cluster in MongoDB.
Each partition has its own set of replicas. To ensure high availability, you must have more than one configuration server or router. In this architecture, you can scale your database according to your needs.
Configuring MongoDB clusters
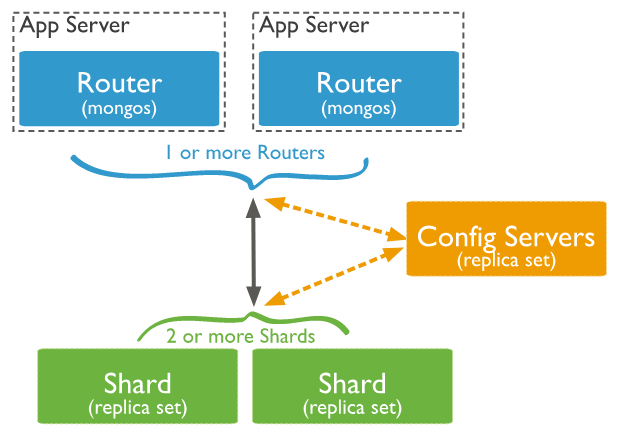
In the following diagram, there are three main components that must be installed when configuring the
MongoDB cluster
partition server
- : Data is stored in fragmentations. They offer high availability as well as data consistency. Each partition in a production environment is a separate set of replicas.
- : Cluster metadata is stored on configuration servers. This data contains a mapping of the cluster dataset to the partitions. The query router uses this metadata to direct operations to specific partitions. Production partitioned clusters have exactly three configuration servers.
- Query routers: Query routers are mongo instances that interact with client applications and route operations to the appropriate partition. The query router processes and routes operations to partitions before returning the results to clients. A partitioned cluster can have multiple query routers to distribute the load of client requests. A client sends queries to a single query router. A partitioned cluster typically has a large number of query routers.
Configuration servers
Steps to configure MongoDB clusters The steps followed to configure MongoDB clusters are as follows: MongoDB clusters: Configuration server configuration MongoDB clusters: configure MongoDB query router clusters: configure partitioning MongoDB
- clusters:
- Add partitioning to the cluster
- MongoDB clusters: Configuration server configuration
1)
The steps to follow are as follows:
- Log in to
- After logging in, you can now edit the configuration file according to
- You can write about your requirements in the /etc/mongodConfig.conf file. You can review the following code snippet for this process and paste it into the /etc/mongodConfig.conf file.
the configuration server.
your requirements.
storage: dbPath: /var/lib/mongodb journal: enabled: true systemLog: destination: file logAppend: true path: /var/log/mongodb/mongodConfig.log net: port: 27019 bindIp: 172.31.46.15 sharding: clusterRole: configsvr replication: replSetName: ConfigReplSet
The meaning of the different fields in the code snippet is as follows
: storage: dbPath: /var/lib/mongodb journal: enabled: true systemLog: target: file logAppend: true path: /var/log/mongodb/mongodConfig.log net: port: 27019 bindIp: 172.31.46.15 sharding: clusterRole: configsvr replication: replSetName: ConfigReplSet
For each process, the log receives the same specific. Indicates which process the registration is for.
Port: 27019 BindIp: 172.31.46.15
Here, we explicitly make it clear that, by default, the configuration server will run on port 27019 in a clustered configuration. We mention the IP address here so that other servers can easily locate our server.
sharding: clusterRole: configsvr
Here sharding indicates that the server is distributed according to a hashtag scheme. And we informed MongoDB that the cluster is a configuration server rather than a shared server.
replication: replSetName: ConfigReplSet
Indicates that the configuration data is to be replicated. You can use rs. () works to promote any replica and you can use any name for this purpose.
- Now, you can start the process. For that you can write the following code:
sudo mongod -config /etc/mongodConfig.conf&
- Now, you can check the logs for errors. You can write the following code for this purpose.
sudo tail -100 /var/log/mongodb/mongodConfig.log
- Now, you can log in to the Mongo shell. For that, type the following code.
mongo 172.31.46.15:27019
- You can then enable replication using the rs.initiate() function. You can check the replication status by using the rs.status() function. It may refer to the following code
:> rs.initiate() { “info2” : “No configuration is specified. Using a default configuration for the set”, “me” : “172.172.31.46.15:27019”, “ok” : 1, “operationTime” : Timestamp(1548598138, 1), “$gleStats” : { “lastOpTime” : Timestamp(1548598138, 1), “electionId” : ObjectId(“0000>1548598138 0000000000000000000000000000000000000000000000000000000000000000000000000000000000000000000000000000000000000000000000000000000000000000000000000000000000000000000000000000000000000000000000000000000000000000000000000000000000000000000000000000000000000000000000000000000000000000000000000000000000000000000000000000000000000000000000000000000000000000000000000000000000000000000000000000000000000000000000000000000000000000000000000000000000000000000000000000000000000000000000000000000000000000000000000000000000000000000000000000000000000000000000000 000000000000000000000000000000000000000000000000000000000000000000000000000000000000000000000000000000000000000000000000000000000000000000000000000000000000000000000000000000000000000000000000000000000000000000000000000000000000000000000000000000000000000000000000000000000000000000000000000000000000000000000000000000000000000000000000000000000000000000000000000000000000000000000000000000000000000000000000000000000000000000000000000000000000000000000000000000000000000000000000000000000000000000 rs.status() { “set” : “ConfigReplSet”,
Here you can notice that the name of the replication set that you configured in the configuration file has its name as ConfigRepISet.
2)
MongoDB Clusters: Configure Query Router
The steps to configure the query router to configure MongoDB clusters are as follows:
- Log on to
- Now, you can write the code to edit the configuration file. You can query
the configuration server.
the following code:sudo vim /etc/mongoRouter.conf
- To edit the file, you can paste the following code to set your requirements
. systemLog: destination: logAppend file: true path: /var/log/mongodb/mongoRouter.log net: port: 27017 bindIp: 172.31.46.15 sharding: configDB: ConfigReplSet/172.31.46.15:27019
Here, configDB: ConfigReplSet/172.31.46.15:27019 indicates the query editor about the location of the configuration server and its replica sets.
- You can now start the service. In the following code, the “s” in mongos is a sign of the query router process.
sudo mongos -config /etc/mongoRouter.conf& You can
- check the log for errors
. mongo 172.31.46.15:27017
3) MongoDB Clusters
: Configure Partitions
The steps to configure partitions in the MongoDB cluster configuration process are as follows:
- Log on to the database server
- Now, you can write the code to edit the configuration file. You can query
.
the following code:sudo vim /etc/mongodShard.conf
- To edit the file, you can paste the following code to set your requirements
. storage: dbPath: /var/lib/mongodb journal: enabled: true systemLog: target: file logAppend: true path: /var/log/mongodb/mongodShard.log net: port: 27018 bindIp: 172.31.47.43 partition: clusterRole: shardsvr replication: replSetName: ShardReplSet
- The meaning of the different fields in the code snippet is as follows
:clusterRole: shardsvr This indicates that
it is a partition server rather than a configuration server
. replSetName: ShardReplSet
Here, this indicates that you can now replicate the data. You are telling the configuration server to replicate the configuration.
Port: 27018 Here,
we explicitly make it clear that, by default, partition servers will run on port 27018 in a clustered configuration
.
- Now, you can start the process. For that you can write the following code:
sudo mongod -config /etc/mongodShard.conf&
- Now, you can check the logs for errors. You can write the following code for this purpose.
sudo tail -f /var/log/mongodb/mongodShard.log
- Now, you can log in to the Mongo shell. For that, type the following code.
mongo 172.31.47.43:27018
- You can then enable replication by using the rs.initiate() function. You can check the replication status by using the rs.status() function. It may refer to the following code
:rs.initiate() { “info2” : “no configuration specified. Using a default setting for the set”, “me” : “172.31.47.43:27018”, “ok” : 1, “operationTime” : Timestamp(1548602253, 1), “$clusterTime” : { “clusterTime” : Timestamp(1548602253, 1), “signature” : { “
- hash” : BinData(0, “AAAAAAAAAAAAAAAAAAAAAAAAAAAAAAAAAAAAAAAAAAAAAAAAAAAAAAAAAAAAAAAAAAAAAAAAAAAAAAAAAAAAAAAAAAAAAAAAAAAAAAAAAAAAAAAAAAAAAAAAAAAAAAAAAAAAAAAAAAAAAAAAAAAAAAAAAAAAAAAAAAAAAAAAAAAAAAAAAAAAAAAAAAAAAAAAAAAAAAAAAAAAAAAAAAAAAAAAAAAAAAAAAAAAAAAAAAAAAAAAAAAAAAAAAAAAAAAAAAAAAAAAAAAAAAAAAAAAAAAAAAAAAAAAAAAAAAAAAAAAAAAAAAAAAAAAAAAAAAAAAAAAAAAAAAAAAAAAAAAAAAAAAAAAAAAAAAAAAAAAAAAAAAAAAAAAAAAAAAAAAAAAAAAAAAAAAAAAAAAAAAAAAAAAAAAAAAAAAAAAAAAAAAAAAAAAAAAAAAAAAAAAAAAAAAAAAAAAAAAAAAAAAAAAAAAAAAAAAAAAAAAAAAAAAAAAA>AAAAAAAAAAAAAAAAAAAAAAAAAAAAAAAAAAAAAAAAAAAAAAAAAAAAAAAAAAAAAAAAAAAAAAAAAAAAAAAAAAAAAAAAAAAAAAAAAAAAAAAAAAAAAAAAAAAAAAAAAAAAAAAAAAAAAAAAAAAAAAAAAAAAAAAAAAAAAAAAAAAAAAAAAAAAAAAAAAAAAAAAAAAAAAAAAAAAAAAAAAAAAAAAAAAAAAAAAAAAAAAAAAAAAAAAAAAAAAAAAAAAAAAAAAAAAAAAAAAAAAAAAAAAAAAAAAAAAAAAAAAAAAAAAAAAAAAAAAAAAAAAAAAAAAAAAAAAAAAAAAAAAAAAAAAAAAAAAAAAAAAAAAAAAAAAAAAAAAAAAAAAAAAAAAAAAAAAAAAAAAAAAAAAAAAAAAAAAAAAAAAAAAAAAAAAAAAAAAAAAAAAAAAAAAAAAAAAAAAAAAAAAAAAAAAAAAAAAAAAAAAAAAAAAAAAAAAAAAAAAAAAAAAA
AAAAAAAAAAAAAAAAAAAAAAAAAAAAAAAAAAAAAAAAAAAAAAAAAAAAAAAAAAAAAAAAAAAAAAAAAAAAAAAAAAAAAAAAAAAAAAAAAAAAAAAAAAAAAAAAAAAAAAAAAAAAAAAAAAAAAAAAAAAAAAAAAAAAAAAAAAAAAAAAAAAAAAAAAAAAAAAAAAAAAAAAAAAAAAAAAAAAAAAAAAAAAAAAAAAAAAAAAAAAAAAAAAAAAAAAAAAAAAAAAAAAAAAAAAAAAAAAAAAAAAAAAAAAAAAAAAAAAAAAAAAAAAAAAAAAAAAAAAAAAAAAAAAAAAAAAAAAAAAAAAAAAAAAAAAAAAAAAAAAAAAAAAAAAAAAAAAAAAAAAAAAAAAAAAAAAAAAAAAAAAAAAAAAAAAAAAAAAAAAAAAAAAAAAAAAAAAAAAAAAAAAAAAAAAAAAAAAAAAAAAAAAAAAAAAAAAAAAAAAAAAAAAAAAAAAAAAAAAAAAAAAAAAAAAAAAAAAAAAAAAAAAAAAAAAAAAAAAAAAAAAAAAAAAAAAAAAAAAAAAAAAAAAAAAAAAAAAAAAAAAAAAAAAAAAAAAAAAAAAAAAAAAAAAAAAAAAAAAAAAAAAAAAAAAAAAAAAAAAAAAAAAAAAAAAAAAAAAAAAAAAAAAAAAAAAAAAAAAAAAAAAAAAAAAAAAAAAAAAAA
4)
MongoDB Clusters: Adding Partitions to the Cluster
The steps to follow to add partitions to a cluster in the MongoDB cluster configuration process are as follows:
- You can go to the configuration server. And, you can connect to the router using
the following code: mongo 172.31.46.15: 27017
- Now, go to the Mongo shell and type the following commands
. sh.addShard( “ShardReplSet/172.31.47.43:27018”) { “shardAdded” : “ShardReplSet”, “ok” : 1, “operationTime” : Timestamp(1548602529, 4), “$clusterTime” : { “clusterTime” : Timestamp(1548602529, 4), “signature” : { “hash” : BinData(0, “AAAAAAAAAAAAAAAAAAAAAAAAAAAAAAAAAAAAAAAAAAAAAAAAAAAAAAAAAAAAAAAAAAAAAAAAAAAAAAAAAAAAAAAAAAAAAAAAAAAAAAAAAAAAAAAAAAAAAAAAAAAAAAAAAAAAAAAAAAAAAAAAAAAAAAAAAAAAAAAAAAAAAAAAAAAAAAAAAAAAAAAAAAAAAAAAAAAAAAAAAAAAAAAAAAAAAAAAAAAAAAAAAAAAAAAAAAAAAAAAAAAAAAAAAAAAAAAAAAAAAAAAAAAAAAAAAAAAAAAAAAAAAAAAAAAAAAAAAAAAAAAAAAAAAAAAAAAAAAAAAAAAAAAAAAAAAAAAAAAAAAAAAAAAAAAAAAAAAAAAAAAAAAAAAAAAAAAAAAAAAAAAAAAAAAAAAAAAAAAAAAAAAAAAAAAAAAAAAAAAAAAAAAAAAAAAAAAAAAAAAAAAAAAAAAAAAAAAAAAAAAAAAAAAAAAAAAAAAAAAAAAAAAAAAAAAAAAAAAAAAAAAAAAAAAAAAAAAAAAAAAAAAAAAAAAAAAAAAAAAAAAAAAAAAAAAAAAAAAAAAAAAAAAAAAAAAAAAAAAAAAAAAAAAAAAAAAAAAAAAAAAAAAAAAAAAAAAAAAAAAAAAAAAAAAAAAAAAAAAAAAAAAAAAAAAAAAAAAAAAAAAAAAAAAAAAAAAAAAAAAAAAAAAAAAAAAAAAAAAAAAAAAAAAAAAAAAAAAAAAAAAAAAAAAAAAAAAAAAAAAAAAAAAAAAAAAAAAAAAAAAAAAAAAAAAAAAAAAAAAAAAAAAAAAAAAAAAAAAAAAAAAAAAAAAAAAAAAAAAAAAAAAAAAAAAAAAAAAAAAAAAAAAAAAAAAAAAAAAAAAAAAAAAAAAAAAAAAAAAAAAAAAAAAAAAAAAAAAAAAAAAAAAAAAAAAAAAAAAAAAAAAAAAAAAAAAAAAAAAAAAAAAAAAAAAAAAAAAAAAAAAAAAAAAAAAAAAAAAAAAAAAAAAAAAAAAAAAAAAAAAAAAAAAAAAAAAAAAAAAAAAAAAAAAAAAAAAAAAAAAAAAAAAAAAAAAAAAAAAAAAAAAAAAAAAAAAAAAAAAAAAAAAAAAAAAAAAAAAAAAAAAAAAAAAAAAAAAAAAAAAAAAAAAAAAAAAAAAAAAAAAAAAAAAAAAAAAAAAAAAAAAAAAAAAAAAAAAAAAAAAAAAAAAAAAAAAAAAAAAAAAAAAAAAAAAAAAAAAAAAAAAAAAAAAAAAAAAAAAAAAAAAAAAAAAAAAAAAAAAAAAAAAAAAAAAAAAAAAAAAAAAAAAAAAAAAAAAAAAAAAAAAAAAAAAAAAAAAAAAAAAAAAAAAAAAAAA
- In this case, a database named “books” is created. And after that, you can enable partitioning for the database. You can refer to the following commands
:use books switched to db books sh.enableSharding(“books”) { “ok” : 1, “operationTime” : Timestamp(1548602601, 6), “$clusterTime” : { “clusterTime” : Timestamp(1548602601, 6), “signature” : { “hash” : BinData(0, “AAAAAAAAAAAAAAAAAAAAAAAAAAAAAAAAAAAAAAAAAAAAAAAAAAAAAAAAAAAAAAAAAAAAAAAAAAAAAAAAAAAAAAAAAAAAAAAAAAAAAAAAAAAAAAAAAAAAAAAAAAAAAAAAAAAAAAAAAAAAAAAAAAAAAAAAAAAAAAAAAAAAAAAAAAAAAAAAAAAAAAAAAAAAAAAAAAAAAAAAAAAAAAAAAAAAAAAAAAAAAAAAAAAAAAAAAAAAAAAAAAAAAAAAAAAAAAAAAAAAAAAAAAAAAAAAAAAAAAAAAAAAAAAAAAAAAAAAAAAAAAAAAAAAAAAAAAAAAAAAAAAAAAAAAAAAAAAAAAAAAAAAAAAAAAAAAAAAAAAAAAAAAAAAAAAAAAAAAAAAAAAAAAAAAAAAAAAAAAAAAAAAAAAAAAAAAAAAAAAAAAAAAAAAAAAAAAAAAAAAAAAAAAAAAAAAAAAAAAAAAAAAAAAAAAAAAAAAAAAAAAAAAAAAAAAAAAAAAAAAAAAAAAAAAAAAAAAAAAAAAAAAAAAAAAAAAAAAAAAAAAAAAAAAAAAAAAAAAAAAAAAAAAAAAAAAAAAAAAAAAAAAAAAAAAAAAAAAAAAAAAAAAAAAAAAAAAAAAAAAAAAAAAAAAAAAAAAAAAAAAAAAAAAAAAAAAAAAAAAAAAAAAAAAAAAAAAAAAAAAAAAAAAAAAAAAAAAAAAAAAAAAAAAAAAAAAAAAAAAAAAAAAAAAAAAAAAAAAAAAAAAAAAAAAAAAAAAAAAAAAAAAAAAAAAAAAAAAAAAAAAAAAAAAAAAAAAAAAAAAAAAAAAAAAAAAAAAAAAAAAAAAAAAAAAAAAAAAAAAAAAAAAAAAAAAAAAAAAAAAAAAAAAAAAAAAAAAAAAAAAAAAAAAAAAAAAAAAAAAAAAAAAAAAAAAAAAAAAAAAAAAAAAAAAAAAAAAAAAAAAAAAAAAAAAAAAAAAAAAAAAAAAAAAAAAAAAAAAAAAAAAAAAAAAAAAAAAAAAAAAAAAAAAAAAAAAAAAAAAAAAAAAAAAAAAAAAAAAAAAAAAAAAAAAAAAAAAAAAAAAAAAAAAAAAAAAAAAAAAAAAAAAAAAAAAAAAAAAAAAAAAAAAAAAAAAAAAAAAAAAAAAAAAAAAAAAAAAAAAAAAAAAAAAAAAAAAAAAAAAAAAAAAAAAAAAAAAAAAAAAAAAAAAAAAA
db.createCollection(“collection”) { “ok” : 1, “operationTime” : Timestamp(1548602659, 5), “$clusterTime” : { “clusterTime” : Timestamp(1548602659, 5), “signature” : { “hash” : BinData(0, “AAAAAAAAAAAAAAAAAAAAAAAAAAAAAAAAAAAAAAAAAAAAAAAAAAAAAAAAAAAAAAAAAAAAAAAAAAAAAAAAAAAAAAAAAAAAAAAAAAAAAAAAAAAAAAAAAAAAAAAAAAAAAAAAAAAAAAAAAAAAAAAAAAAAAAAAAAAAAAAAAAAAAAAAAAAAAAAAAAAAAAAAAAAAAAAAAAAAAAAAAAAAAAAAAAAAAAAAAAAAAAAAAAAAAAAAAAAAAAAAAAAAAAAAAAAAAAAAAAAAAAAAAAAAAAAAAAAAAAAAAAAAAAAAAAAAAAAAAAAAAAAAAAAAAAAAAAAAAAAAAAAAAAAAAAAAAAAAAAAAAAAAAAAAAAAAAAAAAAAAAAAAAAAAAAAAAAAAAAAAAAAAAAAAAAAAAAAAAAAAAAAAAAAAAAAAAAAAAAAAAAAAAAAAAAAAAAAAAAAAAAAAAAAAAAAAAAAAAAAAAAAAAAAAAAAAAAAAAAAAAAAAAAAAAAAAAAAAAAAAAAAAAAAAAAAAAAAAAAAAAAAAAAAAAAAAAAAAAAAAAAAAAAAAAAAAAAAAAAAAAAAAAAAAAAAAAAAAAAAAAAAAAAAAAAAAAAAAAAAAAAAAAAAAAAAAAAAAAAAAAAAAAAAAAAAAAAAAAAAAAAAAAAAAAAAAAAAAAAAAAAAAAAAAAAAAAAAAAAAAAAAAAAAAAAAAAAAAAAAAAAAAAAAAAAAAAAAAAAAAAAAAAAAAAAAAAAAAAAAAAAAAAAAAAAAAAAAAAAAAAAAAAAAAAAAAAAAAAAAAAAAAAAAAAAAAAAAAAAAAAAAAAAAAAAAAAAAAAAAAAAAAAAAAAAAAAAAAAAAAAAAAAAAAAAAAAAAAAAAAAAAAAAAAAAAAAAAAAAAAAAAAAAAAAAAAAAAAAAAAAAAAAAAAAAAAAAAAAAAAAAAAAAAAAAAAAAAAAAAAAAAAAAAAAAAAAAAAAAAAAAAAAAAAAAAAAAAAAAAAAAAAAAAAAAAAAAAAAAAAAAAAAAAAAAAAAAAAAAAAAAAAAAAAAAAAAAAAAAAAAAAAAAAAAAAAAAAAAAAAAAAAAAAAAAAAAAAAAAAAAAAAAAAAAAAAAAAAAAAAAAAAAAA
db.collection.createIndex( { isbn: -1 } ) { “raw” : { “ShardReplSet/172.31.47.43:27018” : { “createdCollectionAutomatically” : false, “numIndexesBefore” : 1, “numIndexesAfter” : 2, “ok” : 1 } }, “ok” : 1, “operationTime” : Timestamp(1548602670, 9), “$clusterTime” : { “clusterTime” : Timestamp(1548602670, “signature” : { “hash” : BinData(0, “AAAAAAAAAAAAAAAAAAAAAAAAAAAAAAAAAAAAAAAAAAAAAAAAAAAAAAAAAAAAAAAAAAAAAAAAAAAAAAAAAAAAAAAAAAAAAAAAAAAAAAAAAAAAAAAAAAAAAAAAAAAAAAAAAAAAAAAAAAAAAAAAAAAAAAAAAAAAAAAAAAAAAAAAAAAAAAAAAAAAAAAAAAAAAAAAAAAAAAAAAAAAAAAAAAAAAAAAAAAAAAAAAAAAAAAAAAAAAAAAAAAAAAAAAAAAAAAAAAAAAAAAAAAAAAAAAAAAAAAAAAAAAAAAAAAAAAAAAAAAAAAAAAAAAAAAAAAAAAAAAAAAAAAAAAAAAAAAAAAAAAAAAAAAAAAAAAAAAAAAAAAAAAAAAAAAAAAAAAAAAAAAAAAAAAAAAAAAAAAAAAAAAAAAAAAAAAAAAAAAAAAAAAAAAAAAAAAAAAAAAAAAAAAAAAAAAAAAAAAAAAAAAAAAAAAAAAAAAAAAAAAAAAAAAAAAAAAAAAAAAAAAAAAAAAAAAAAAAAAAAAAAAAAAAAAAAAAAAAAAAAAAAAAAAAAAAAAAAAAAAAAAAAAAAAAAAAAAAAAAAAAAAAAAAAAAAAAAAAAAAAAAAAAAAAAAAAAAAAAAAAAAAAAAAAAAAAAAAAAAAAAAAAAAAAAAAAAAAAAAAAAAAAAAAAAAAAAAAAAAAAAAAAAAAAAAAAAAAAAAAAAAAAAAAAAAAAAAAAAAAAAAAAAAAAAAAAAAAAAAAAAAAAAAAAAAAAAAAAAAAAAAAAAAAAAAAAAAAAAAAAAAAAAAAAAAAAAAAAAAAAAAAAAAAAAAAAAAAAAAAAAAAAAAAAAAAAAAAAAAAAAAAAAAAAAAAAAAAAAAAAAAAAAAAAAAAAAAAAAAAAAAAAAAAAAAAAAAAAAAAAAAAAAAAAAAAAAAAAAAAAAAAAAAAAAAAAAAAAAAAAAAAAAAAAAAAAAAAAAAAAAAAAAAAAAAAAAAAAAAAAAAAAAAAAAAAAAAAAAAAAAAAAAAAAAAAAAAAAAAAAAAAAAAAAAAAAAAAAAAAAAAAAAAAAAAAAAAAAAAAAAAAAAAAAAAAAAAAAAAAAAAAAAAAAAAAAAAAAAAAAAAAAAAAAAAAAAAAAAAAAAAAAAAAAAAAAAAAAAAAAAAAAAAAAAAAAAAAAAAAAAAAAAAAAAAAAAAAAAAAAAAAAAAAAAAAAAAAAAAAAAAAAAAAAAAAAAAAAAAAAAAAAAAAAAAAAAAAAAAAAAAAAAAAAAAAAAAAAAAAAAAAAAAAAAAAAAAAAAAAAAAAAAAAAAAAAAAAAAAAAAAAAAAAAAAAAAAAAAAAAAAAAAAAAAAAAAAAAAAAAAAAAAAAAAAAAAAAAAAAAAAAAAAAAAAAAAAAAAAAAAAAAAAAAAAAAAAAAAAAAAAAAAAAAAAAAAAAAAAAAAAAAAAAAAAAAAAAAAAAAAAAAAAAAAAAAAAAAAAAAAAAAAAAAAAAAAAAAAAAAAAAAAAAAAAAAAAAAAAAAA AAAAAAAAAAAAAAAAAAAAAAAAAAAAAAAAAAAAAAAAAAAAAAAAAAAAAAAAAAAAAAAAAAAAAAAAAAAAAAAAAAAAAAAAAAAAAAAAAAAAAAAAA
- To add a record, you can refer to the following commands.
db.collection.insertOne( { isbn: 100 } ) { “acknowledged” : true, “insertedId” : ObjectId(“5c4dcd69e83741cb900b46f8”) }
- Now, enable partitioning for the
collection. sh.shardCollection(“books.collection”, { isbn : “hashed” } ) { “collectionsharded” : “books.collection”, “collectionUUID” : UUID(“0d10320b-3086-472e-a3ac-4be67fae21f9”), “ok” : 1, “operationTime” : Timestamp(1548603537, 12), “$clusterTime” : { “clusterTime” : Timestamp(1548603537, 12), “signature” : { “hash” : BinData(0, “AAAAAAAAAAAAAAAAAAAAAAAAAAAAAAAAAAAAAAAAAAAAAAAAAAAAAAAAAAAAAAAAAAAAAAAAAAAAAAAAAAAAAAAAAAAAAAAAAAAAAAAAAAAAAAAAAAAAAAAAAAAAAAAAAAAAAAAAAAAAAAAAAAAAAAAAAAAAAAAAAAAAAAAAAAAAAAAAAAAAAAAAAAAAAAAAAAAAAAAAAAAAAAAAAAAAAAAAAAAAAAAAAAAAAAAAAAAAAAAAAAAAAAAAAAAAAAAAAAAAAAAAAAAAAAAAAAAAAAAAAAAAAAAAAAAAAAAAAAAAAAAAAAAAAAAAAAAAAAAAAAAAAAAAAAAAAAAAAAAAAAAAAAAAAAAAAAAAAAAAAAAAAAAAAAAAAAAAAAAAAAAAAAAAAAAAAAAAAAAAAAAAAAAAAAAAAAAAAAAAAAAAAAAAAAAAAAAAAAAAAAAAAAAAAAAAAAAAAAAAAAAAAAAAAAAAAAAAAAAAAAAAAAAAAAAAAAAAAAAAAAAAAAAAAAAAAAAAAAAAAAAAAAAAAAAAAAAAAAAAAAAAAAAAAAAAAAAAAAAAAAAAAAAAAAAAAAAAAAAAAAAAAAAAAAAAAAAAAAAAAAAAAAAAAAAAAAAAAAAAAAAAAAAAAAAAAAAAAAAAAAAAAAAAAAAAAAAAAAAAAAAAAAAAAAAAAAAAAAAAAAAAAAAAAAAAAAAAAAAAAAAAAAAAAAAAAAAAAAAAAAAAAAAAAAAAAAAAAAAAAAAAAAAAAAAAAAAAAAAAAAAAAAAAAAAAAAAAAAAAAAAAAAAAAAAAAAAAAAAAAAAAAAAAAAAAAAAAAAAAAAAAAAAAAAAAAAAAAAAAAAAAAAAAAAAAAAAAAAAAAAAAAAAAAAAAAAAAAAAAAAAAAAAAAAAAAAAAAAAAAAAAAAAAAAAAAAAAAAAAAAAAAAAAAAAAAAAAAAAAAAAAAAAAAAAAAAAAAAAAAAAAAAAAAAAAAAAAAAAAAAAAAAAAAAAAAAAAAAAAAAAAAAAAAAAAAAAAAAAAAAAAAAAAAAAAAAAAAAAAAAAAAAAAAAAAAAAAAAAAAAAAAAAAAAAAAAAAAAAAAAAAAAAAAAAAAAAAAAAAAAAAAAAAAAAAAAAAAAAAAAAAAAAAAAAAAAAAAAAAAAAAAAAAAAAAAAAAAAAAAAAAAAAAAAAAAAAAAAAAAAAAAAAAAAAAAAAAAAAAAAAAAAAAAAAAAAAAAAAAAAAAAAAAAAAAAAAAAAAAAAAAAAAAAAAAAAAAAAAAAAAAAAAAAAAAAAAAAAAAAAAAAAAAAAAAAAAAAAAAAAAAAAAAAAAAAAAAAAAAAAAAAAAAAAAAAAAAAAAAAAAAAAAAAAAAAAAAAAAAAAAAAAAAAAAAAAAAAAAAAAAAAAAAAAAAAAAAAAAAAAAAAAAAAAAAAAAAAAAAAAAAAAAAAAAAAAAAAAAAAAAAAAAAAAAAAAAAAAAAAAAAAAAAAAAAAAAAAAAAAAAAA
- Now, you need to verify that the data is distributed across the cluster. In this case, because you have a database server, it will only display one.
db.collection.getShardDistribution() Shard ShardReplSet in ShardReplSet/172.31.47.43:27018 data : 0B docs : 0 chunks : 2 estimated data per fragment : 0B documents estimated per fragment : 0 Total data : 0B docs : 0 chunks : 2 Shard ShardReplSet contains data NaN%, NaN% docs in cluster, avg obj siz
Conclusion
In this article, you learned about MongoDB Clusters. This article also focused on MongoDB, its key features, the different architectures of MongoDB clusters, and the steps required to configure MongoDB clusters.
Hevo Data, a no-code data pipeline, provides you with a consistent and reliable solution to manage data transfer between a variety of sources and a wide variety of desired destinations with a few clicks.
Visit our website to explore Hevo
Hevo Data with its strong integration with 100+ data sources (including 40+ free sources) allows you to not only export data from the desired data sources and upload it to the destination of your choice, but also transform and enrich your data so that it is ready for analysis. Hevo also enables data integration from non-native sources using Hevo’s built-in REST API and Webhooks connector. You can then focus on your key business needs and perform insightful analysis using BI tools.
Want to try Hevo? Sign up for a 14-day free trial and experience the feature-rich Hevo suite firsthand. You can also take a look at the amazing price, which will help you select the best plan for your needs.
Share your experience of understanding the MongoDB cluster configuration process in the comments section below! We’d love to hear your thoughts.