Back to: MySQL tutorials for beginners and professionals
Exporting and importing databases using MySQL Workbench In this article, I am going to discuss how to export
and import MySQL databases using MySQL Workbench
. Read our previous article, where we discussed how to insert, update, and delete rows of data using MySQL Workbench.
Export MySQL database using MySQL Workbench: To export a database using MySQL
Workbench
, we must have a database on our MySQL Server. So, first let’s create a database called School and Student and StudentAddress tables with some data. Use the following SQL script to create the database, table, and data.
CREATE DATABASE School; USE School; CREATE TABLE ‘School’.’ Students'( StudentId INT PRIMARY KEY, FirstName VARCHAR(50), LastName VARCHAR(50), Class VARCHAR(50), Age INT ); INSERT INTO ‘school’.’ students’ (StudentId, FirstName, LastName, Class, Age) VALUES (1, ‘Anurag’, ‘Mohanty’, ‘First’, 18); INSERT INTO ‘school’.’ students’ (StudentId, FirstName, LastName, Class, Age) VALUES (2, ‘Priyanka’, ‘Dewangan’, ‘Second’, 17); INSERT INTO ‘school’.’ students’ (StudentId, FirstName, LastName, Class, Age) VALUES (3, ‘Hina’, ‘Sharma’, ‘First’, 19); INSERT INTO ‘school’.’ students’ (StudentId, FirstName, LastName, Class, Age) VALUES (4, ‘Sambit’, ‘Monanty’, ‘Second’, 17); CREATE TABLE ‘school’.’ studentaddress’ ( AddressId INT PRIMARY KEY, StudentId INT NOT NULL, City VARCHAR(200), State VARCHAR(200) ); INSERT INTO ‘school’.’ studentaddress’ (AddressId, StudentId, City, State) VALUES (1, 1, ‘BBSR’, ‘Odisha’); INSERT INTO ‘school’.’ studentaddress’ (AddressId, StudentId, City, State) VALUES (2, 2, ‘Mumbai’, ‘Maharashtra’); INSERT INTO ‘school’.’ studentaddress’ (AddressId, StudentId, City, State) VALUES (3, 3, ‘BBSR’, ‘Odisha’); INSERT INTO ‘school’.’ studentaddress’ (AddressId, StudentId, City, State) VALUES (4, 4, ‘Mumbai’, ‘Maharashtra’);
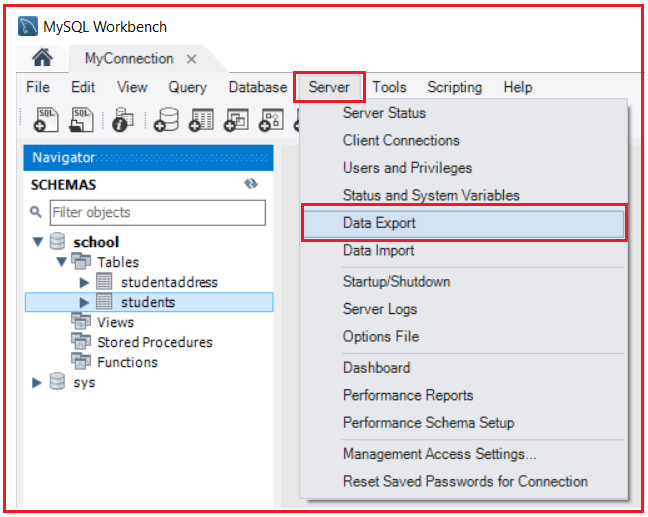
Now let’s see how to export the school database. To do so, from the top menu, select ‘Server’ and ‘Data Export’ option as shown in the image below.
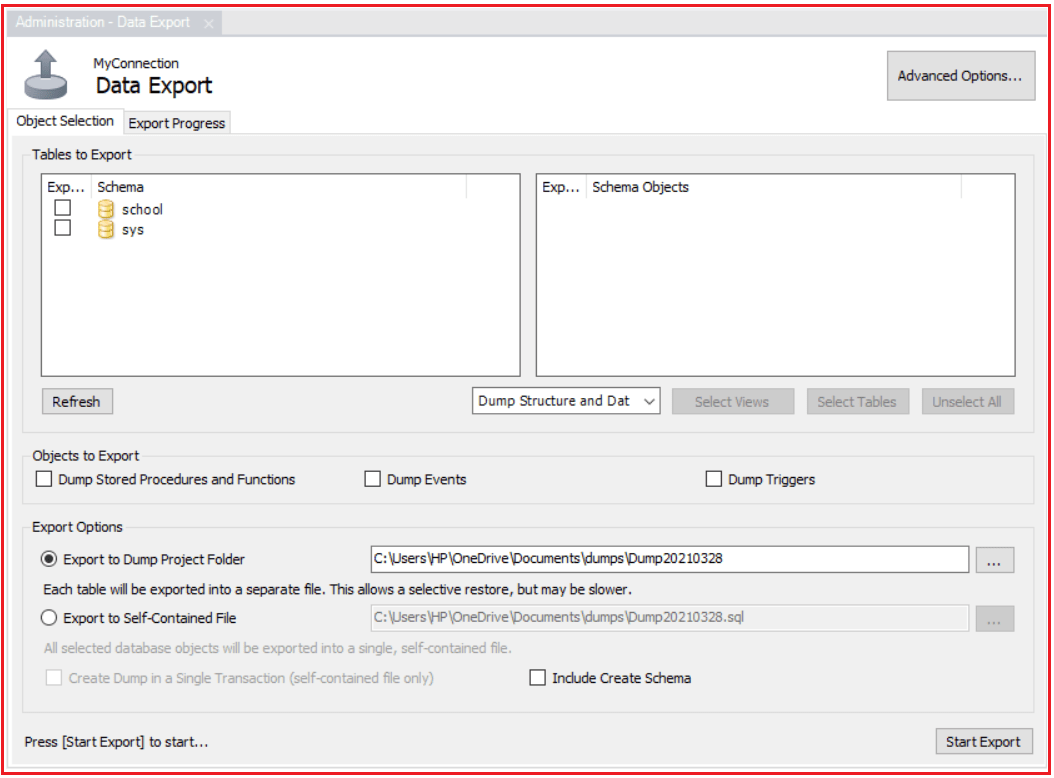
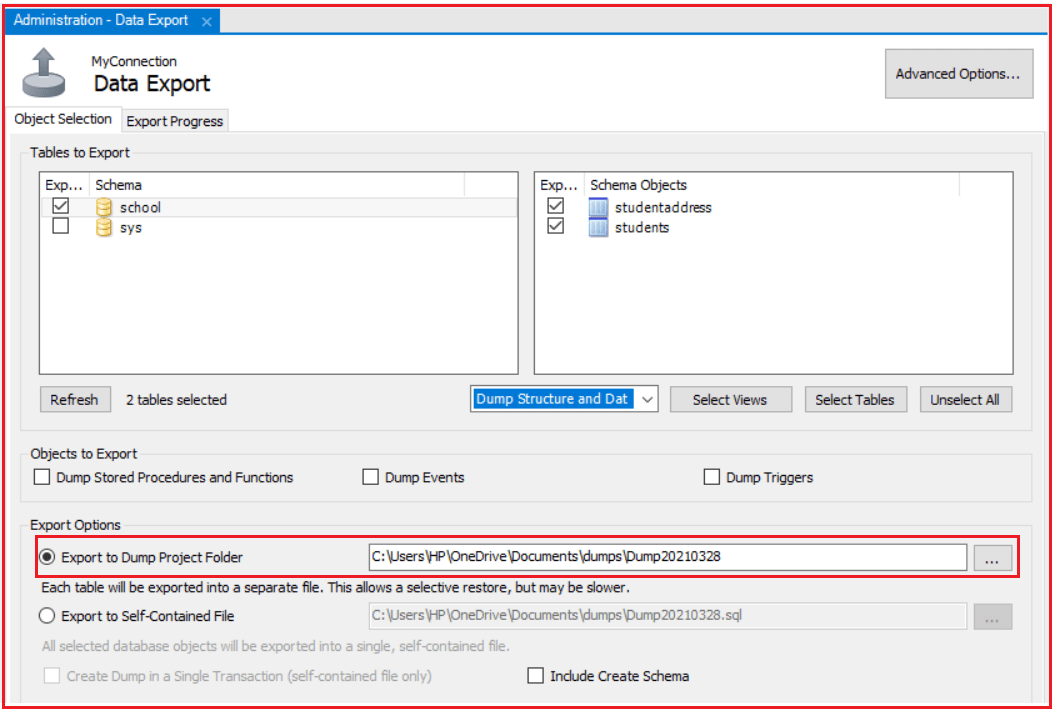
Will open the data export options and settings window as shown below. The left section of the window displays all existing databases on our MySQL database server. When we select a database by clicking on it, it will show all the respected tables below the selected database. We can select one or more checkboxes from the database to include the database in the Export file. We can also select one or more tables from the right section of this window.
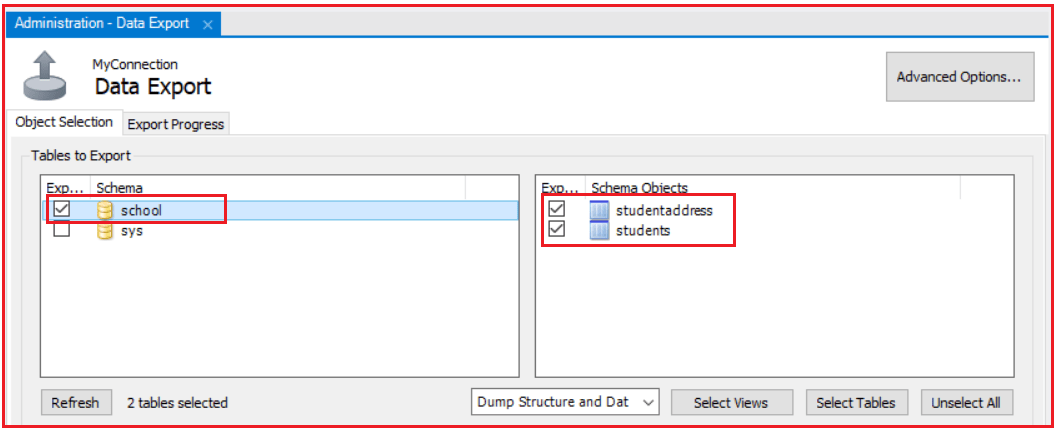
So, let’s select our school database that we created earlier. And on the right side panel, select the student table and student address as shown in the image below.
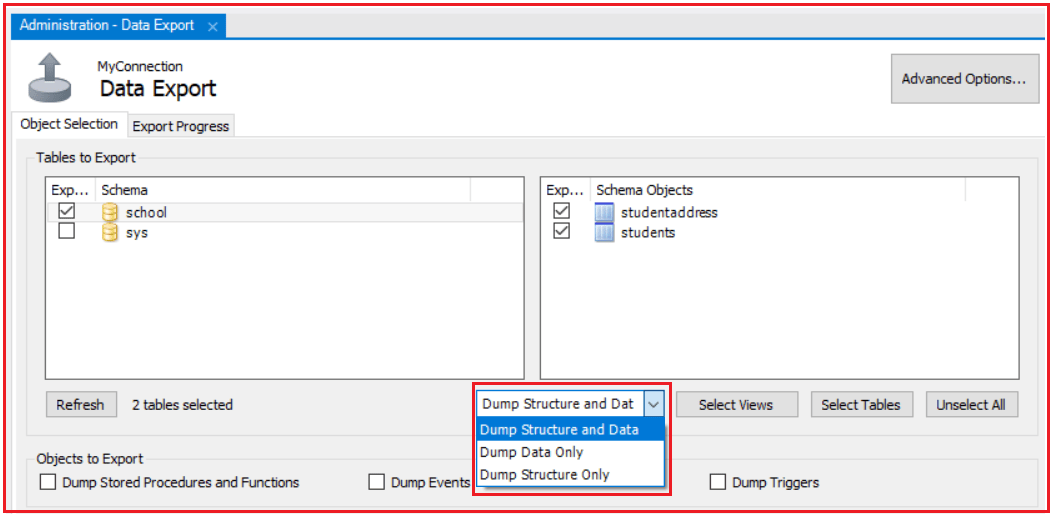
In the drop-down configuration, we can select the option ‘Dump structure only’, ‘Data dump only’ or ‘Dump and data structure’. The ‘Dump structure only’ option will save only the table structure. That is, database columns and data types defined by us. While the ‘Dump Data Only’ option will save only the rows inserted in the tables. The Dump and Data Structure option will save both the data and the structure. Let’s choose the ‘Dump and Data Structure’ option to save both the table structure and the rows of data in it as shown in the image below.
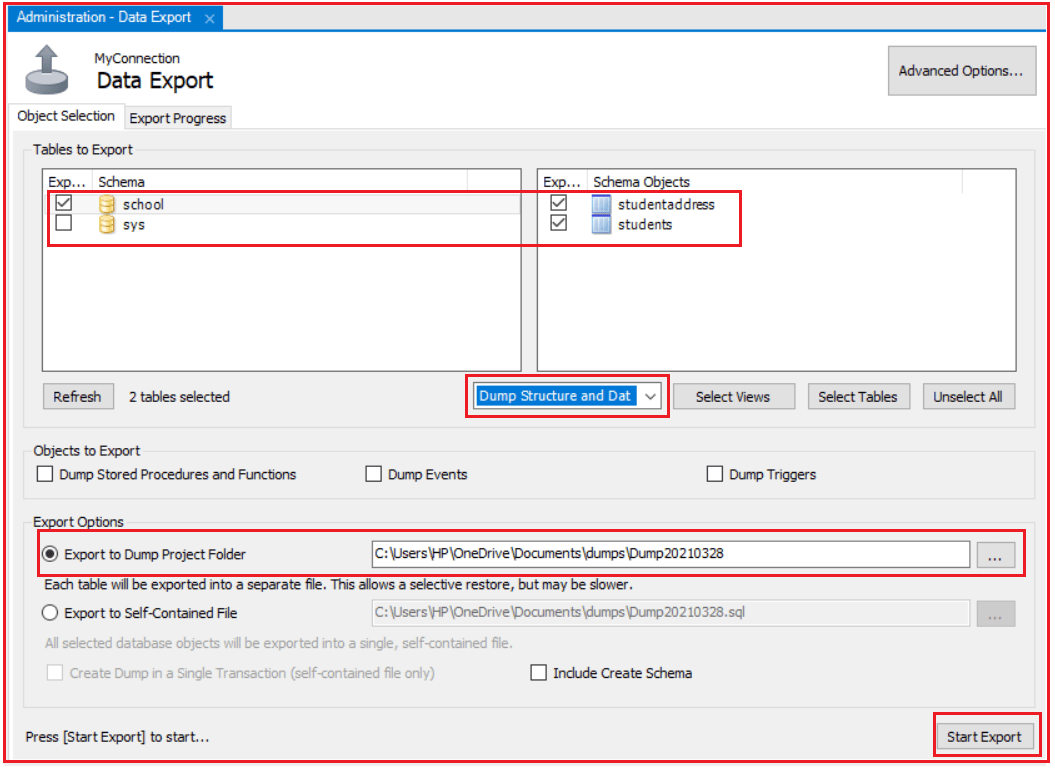
In the Export Options section, you can change the default export path of your choice and I go with the default one. In addition, there are two radio buttons. By selecting the first option which is ‘Export to Dump Project Folder’, MySQL Workbench will save all tables as separate SQL files in one folder, which is useful when you are going to import or restore the export file one by one. The second option Export to standalone file will store all databases and tables in a single SQL file. This is a good option when you are importing all databases, tables, and rows of data using a single SQL file. We will export the database using both methods, to understand the difference. Let’s export the database using the first option ‘Export to dump project folder’ as shown in the image below.
Finally, click the start export button to start the export functionality as shown in the image below.
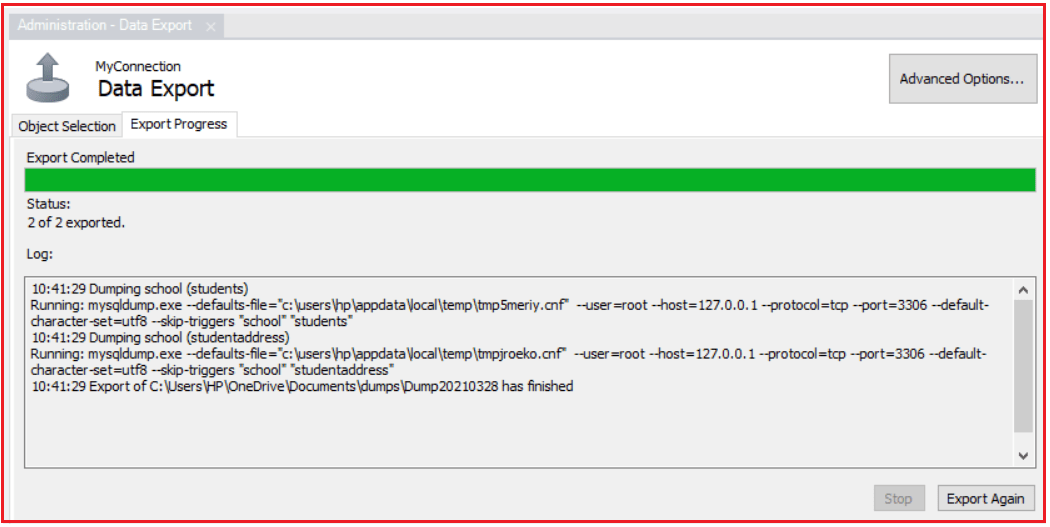
Once you click on the export start button, it will display the progress bar and log as shown in the image below.
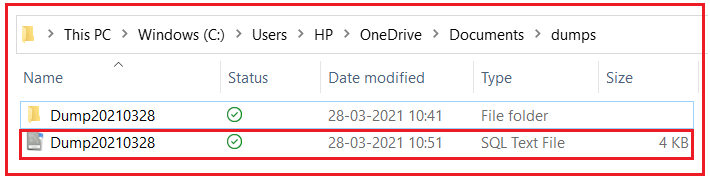
 Now, if you go to the
location where you saved the file, you will see multiple SQL files that are nothing more than individual tables as shown in the image below.
Now go back to the Server = > Data Export window and this time select the Export to standalone file option and click the Start Export button as shown in the image below.
<img src="https://dotnettutorials.net/wp-content/uploads/2021/03/word-image-278.png" alt="how to export and import MySQL databases using MySQL Workbench" />
Once the export was successful, go to the folder location
where this file was saved and you will see under the dumps folder, we have a single dump file that includes all databases and tables, and rows of data as shown in the image below.
<img src
=”https://dotnettutorials.net/wp-content/uploads/2021/03/word-image-279.png” alt=”how to export MySQL databases using MySQL Workbench” />Import database
using MySQL Workbench
Before importing the database
, let’s first delete the tables that are already there in the school database by executing the following SQL statement
.
PLACEMENT TABLE school.studentaddress; DROP TABLE school.students;
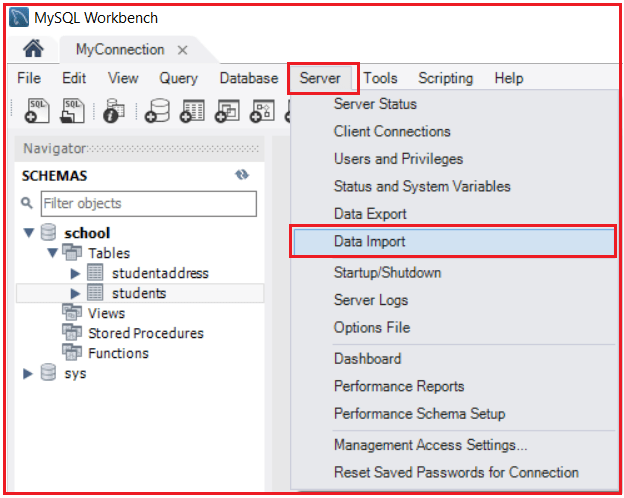
Now let’s learn how to import the database and tables using MySQL workbench. Go to the top menu ‘Server’ and select the ‘Data Import’ option as shown in the image below.
The ‘Data Import
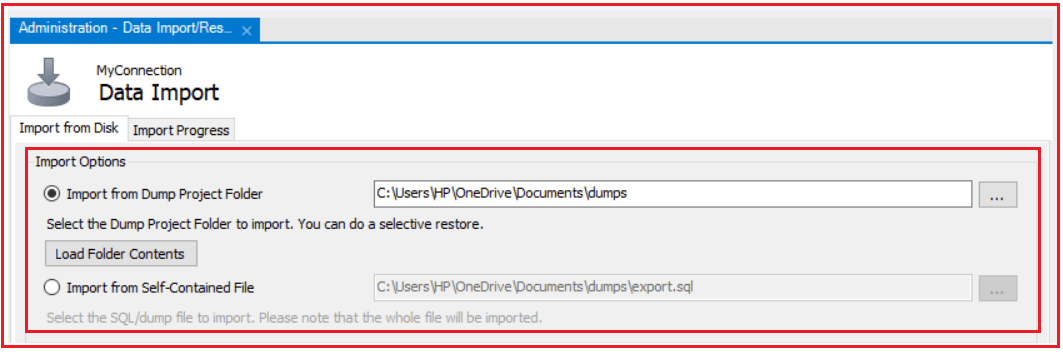
‘ window will open which is exactly opposite to the data export window as shown in the image below. Here you can import from the project dump folder or import using a single separate file.
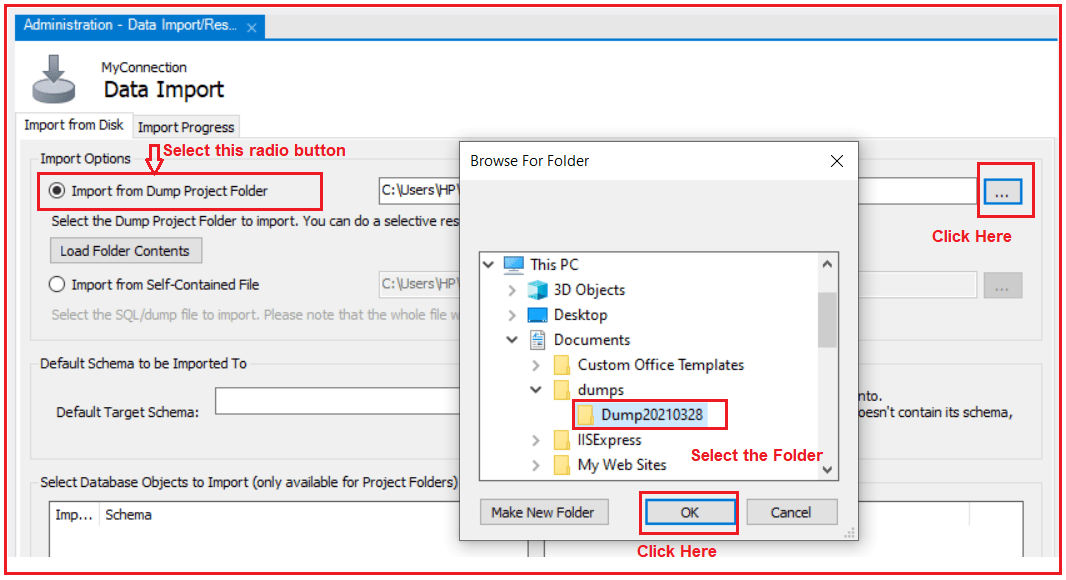
Here, I am selecting the Import from dump project folder radio button option
, and then I will select the dump project folder location where we save the file while exporting as shown in the image below.
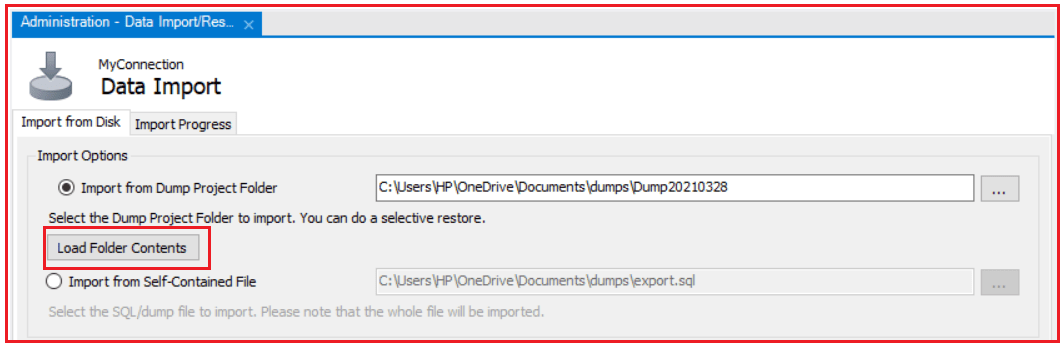
Once you select the Import from Dump project folder, click the ‘Load Folder Contents’ button to display all available databases in the ‘project folder’ as shown in the image below.
Next, select the school database in the left pane and select the
tables you want to import from the right side, select the Dump Structure and Data option from the drop-down list, and then click Select Tables and finally click the Start Import button as shown in the Image below.
Once you click the Start Import button, you will import the data, and if the import was completed successfully, you will get the following window.
Now, again, in the
schemas option, go to the school database, and in the tables tab click on ‘update’ and you will see that the student tables and student addresses appear again as shown in the image below.
<img src
=”https://dotnettutorials.net/wp-content/uploads/2021/03/word-image-286.png” alt=”Export and import MySQL databases using MySQL Workbench” />
In this way, we can export and import a single database table or multiple tables using the MySQL Workbench ‘Data Export’ and ‘Data Import’ options
.
In the next article, I will discuss data types in MySQL with examples. Here in this article, I try to explain how to export and import MySQL databases using MySQL Workbench and I hope you enjoy this article Exporting and importing MySQL databases using MySQL Workbench.